一、修改SSH登录信息
开启 root ssh 登录
sudo vim /etc/ssh/sshd_config
修改:
PermitRootLogin yes
删掉`#PasswordAuthentication yes`前面的`#`

给root设置密码
passwd root
重启 sshd
/etc/init.d/ssh restart 或 systemctl restart sshd
关闭防火墙
ufw disable
二、修改IP
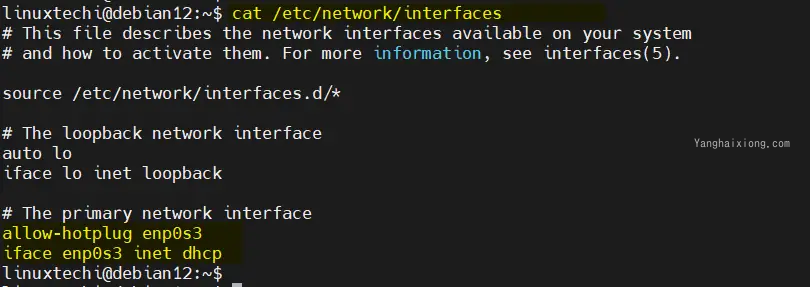
备份 interfaces
sudo cp /etc/network/interfaces /etc/network/interfacesbak
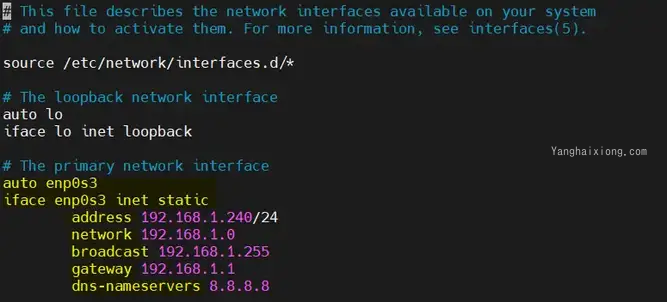
编辑文件并设置静态 IP 地址,如下所示,
sudo vim /etc/network/interfaces
用下面显示的方式替换 ‘allow-htplug enp0s3’ 行,并将 dhcp 参数更改为 static。以下是我的示例文件,根据您的环境更改接口名称和 IP 详细信息。
auto enp0s3
iface enp0s3 inebobyai t static
address 192.168.1.240/24
network 192.168.1.0
broadcast 192.168.1.255
gateway 192.168.1.1
dns-nameservers 8.8.8.8
为了使上述更改生效,重新启动网络服务
sudo systemctl restart networking.service
现在,运行 ip 命令以验证 IP 地址,
ip add show
尽管IPv6是互联网的新基石,有着数量多的优势,但是目前很多时候IPv6的支持并不完整,有时候会因为IPv6遇到一些奇奇怪怪的兼容性问题。于是就需要关闭IPv6而强制使用IPv4进行互联网连接。
现给出两个方法,本质上都是通过改写sysctl实现的,第一种是在sysctl.d中新加入配置文件,第二中是直接修改sysctl.conf配置文件,推荐使用第一种从而避免误操作影响其他配置文件。
(一)方法一:在sysctl.d中新加入配置文件
在/etc/sysctl.d/文件夹中新建disable-ipv6.conf,并写入配置
cd /etc/sysctl.d/
touch disable-ipv6.conf
echo net.ipv6.conf.all.disable_ipv6=1 > disable-ipv6.conf
使用以下命令运行配置文件
sysctl -p -f /etc/sysctl.d/disable-ipv6.conf
如果使用ip a命令,在输出中没有发现IPv6地址,则说明成功关闭了IPv6功能。
(二)方法二:直接修改sysctl.conf配置文件
打开/etc/sysctl.conf,在Uncomment the next line to enable packet forwarding for IPv6前一行添加以下三行内容:
net.ipv6.conf.all.disable_ipv6=1
net.ipv6.conf.default.disable_ipv6=1
net.ipv6.conf.lo.disable_ipv6=1
net.ipv6.conf.ens3.disable_ipv6 = 1
注意ens3这个,由于每个设备的网卡名字都有可能不同,需要使用ip a命令查找一下具体的名称以替换掉ens3。
使用以下命令运行配置文件:
sysctl -p
如果使用ip a命令,在输出中没有发现IPv6地址,则说明成功关闭了IPv6功能。
(三)网速测试
1. 安装 Speedtest CLI
Speedtest CLI 是 Ookla 官方推出的 Linux / BSD 下的 CLI 工具,方便我们在服务器里直接测试公网带宽速度。
首先,导入 GPG Key 并添加源:
apt install -y lsb-release ca-certificates apt-transport-https curl gnupg dpkg
curl -sSL https://packagecloud.io/ookla/speedtest-cli/gpgkey | gpg --dearmor > /usr/share/keyrings/speedtest.gpg
echo "deb [arch=$(dpkg --print-architecture) signed-by=/usr/share/keyrings/speedtest.gpg] https://packagecloud.io/ookla/speedtest-cli/debian/ $(lsb_release -sc) main" > /etc/apt/sources.list.d/speedtest.list
然后更新系统并安装 speedtest:
apt update
apt install speedtest -y
2. 使用 Speedtest CLI
安装完毕后我们即可使用默认的 speedtest 命令选择最近的节点并使用默认的网络测速,提示 Do you accept the license? [type YES to accept] 时,输入 YES 并回车即可:
3. 高级用法
输入 speedtest -h 即可查看 speedtest 的命令参数:
root@debian ~ # speedtest -h
Speedtest by Ookla is the official command line client for testing the speed and performance of your internet connection.

Version: speedtest 1.1.1.28

Usage: speedtest [<options>]
  -h, --help                        Print usage information
  -V, --version                     Print version number
  -L, --servers                     List nearest servers
  -s, --server-id=#                 Specify a server from the server list using its id
  -I, --interface=ARG               Attempt to bind to the specified interface when connecting to servers
  -i, --ip=ARG                      Attempt to bind to the specified IP address when connecting to servers
  -o, --host=ARG                    Specify a server, from the server list, using its host's fully qualified domain name
  -p, --progress=yes|no             Enable or disable progress bar (Note: only available for 'human-readable'
                                    or 'json' and defaults to yes when interactive)
  -P, --precision=#                 Number of decimals to use (0-8, default=2)
  -f, --format=ARG                  Output format (see below for valid formats)
      --progress-update-interval=#  Progress update interval (100-1000 milliseconds)
  -u, --unit[=ARG]                  Output unit for displaying speeds (Note: this is only applicable
                                    for ‘human-readable’ output format and the default unit is Mbps)
  -a                                Shortcut for [-u auto-decimal-bits]
  -A                                Shortcut for [-u auto-decimal-bytes]
  -b                                Shortcut for [-u auto-binary-bits]
  -B                                Shortcut for [-u auto-binary-bytes]
      --selection-details           Show server selection details
      --ca-certificate=ARG          CA Certificate bundle path
  -v                                Logging verbosity. Specify multiple times for higher verbosity
      --output-header               Show output header for CSV and TSV formats

 Valid output formats: human-readable (default), csv, tsv, json, jsonl, json-pretty

 Machine readable formats (csv, tsv, json, jsonl, json-pretty) use bytes as the unit of measure with max precision

 Valid units for [-u] flag:
   Decimal prefix, bits per second:  bps, kbps, Mbps, Gbps
   Decimal prefix, bytes per second: B/s, kB/s, MB/s, GB/s
   Binary prefix, bits per second:   kibps, Mibps, Gibps
   Binary prefix, bytes per second:  kiB/s, MiB/s, GiB/s
   Auto-scaled prefix: auto-binary-bits, auto-binary-bytes, auto-decimal-bits, auto-decimal-bytes
比较实用的有:
指定出口网卡:
speedtest -I 指定网卡名称
指定出口 IP:
speedtest -i IP 地址
注意指定网卡或 IP 后可能会出现 [error] Error: [0] Cannot open socket 的错误提示,忽略即可。
查看附近的测速节点列表:
speedtest -L
指定某个测速节点:
speedtest -s 测速节点 ID
三、修改软件源
Debian默认的软件源可能不在国内,导致软件包下载速度较慢。为了解决这个问题,我们可以将软件源替换为国内的镜像站点。
- 备份原来的软件源列表:
sudo cp /etc/apt/sources.list /etc/apt/sources.list.bak
- 打开软件源列表文件:
sudo vi /etc/apt/sources.list
- 将以下内容复制到文件中,这里以清华大学镜像为例:
注意以下内容只适用于 Debian12 版本
# 默认注释了源码镜像以提高 apt update 速度,如有需要可自行取消注释
deb https://mirrors.tuna.tsinghua.edu.cn/debian/ bookworm main contrib non-free non-free-firmware
# deb-src https://mirrors.tuna.tsinghua.edu.cn/debian/ bookworm main contrib non-free non-free-firmware
deb https://mirrors.tuna.tsinghua.edu.cn/debian/ bookworm-updates main contrib non-free non-free-firmware
# deb-src https://mirrors.tuna.tsinghua.edu.cn/debian/ bookworm-updates main contrib non-free non-free-firmware
deb https://mirrors.tuna.tsinghua.edu.cn/debian/ bookworm-backports main contrib non-free non-free-firmware
# deb-src https://mirrors.tuna.tsinghua.edu.cn/debian/ bookworm-backports main contrib non-free non-free-firmware
# deb https://mirrors.tuna.tsinghua.edu.cn/debian-security bookworm-security main contrib non-free non-free-firmware
# # deb-src https://mirrors.tuna.tsinghua.edu.cn/debian-security bookworm-security main contrib non-free non-free-firmware
deb https://security.debian.org/debian-security bookworm-security main contrib non-free non-free-firmware
# deb-src https://security.debian.org/debian-security bookworm-security mabobyai in contrib non-free non-free-firmware
然后更新,显示的内容中有 tuna 即设置成功
apt-get update
显示包含以下内容即为成功
Hit:1 https://mirrors.tuna.tsinghua.edu.cn/debian bookworm InRelease
Hit:2 https://mirrors.tuna.tsinghua.edu.cn/debian bookworm-updates InRelease
Hit:3 https://mirrors.tuna.tsinghua.edu.cn/debian bookworm-backports InRelease
....
- 更新软件包列表:
sudo apt update
四、性能优化
- 禁用不必要的服务
为了提高系统性能,可以关闭一些不必要的服务。以下命令可以列出所有正在运行的服务:
sudo systemctl list-unit-files --type=service
然后,根据需要禁用不必要的服务,例如:
sudo systemctl disable cups.service
- 调整内存分配策略
vm.swappiness=10
vm.vfs_cache_pressure=50
然后执行以下命令使配置生效:
sudo sysctl -p
- 更新内核
Debian默认的内核可能不是最新的,您可以通过以下命令安装最新的内核:
sudo apt install linux-image-amd64
然后重启计算机,以使用新的内核。
五、加入sudo用户组
前面提到,安装时root账号密码可设可不设,如果设置了,则root账号生效,用户账号默认不列入sudoers列表,用不了sudo命令,只能su;如果不设置,则用户账号在sudoers列表,我一般是设root密码,所以第一时间要把自己的账号加入sudoers列表。
user@debian:~$ su
密码:(此处输入root密码)
user@debian:/home/user# nano /etc/sudoers
找到root ALL=(ALL:ALL) ALL这行,
# User privilege specification
root    ALL=(ALL:ALL) ALL
在下面添加一行内容:
# User privilege specification
root    ALL=(ALL:ALL) ALL
user    ALL=(ALL:ALL) NOPASSWD:ALL
这里加NOPASSWD,作用是执行sudo命令时不用再输入密码,要不每次都要密码很烦人。
六、部分命令输出别名
用惯了ubuntu的朋友,一定很喜欢使用ll命令来代替ls -al命令,还有给命令输出上一些简单的颜色,等等。debian 12 中想要这样只需要修改用户目录下面的环境变量文件 .bashrc 即可:
$ su
cd /home/$(echo $USER)/
nano .bashrc
# 找到并取消下面这些代码前面的注释即可
alias grep='grep --color=auto'
alias fgrep='fgrep --color=auto'
alias egrep='egrep --color=auto'

alias ll='ls -l'
alias la='ls -A'
alias l='ls -CF'
七、更新命令
sudo apt update
sudo apt upgrade
八、安装常用插件
VIM
默认自带是 vim 并不是完整版的,使用上有好多问题,需要重新安装完整版的 vim
sudo apt remove vim-common
sudo apt install vim
在使用crontab -e命令时注意选择vim.basic
可以创建~/.vimrc配置文件,参考如下: [[vimrc]]
还可以将 .vimrc 添加到默认用户配置文件
cp ~/.vimrc /etc/skel/.vimrc
**终端系统资源监控(top美化版)
apt install htop
九、swap 优化
在 Debian 12 上,Swap 优化可能有助于提高系统性能,特别是当内存不足时。优化主要集中在以下几个方面:
- 调整 Swapiness:定义内核何时开始使用 Swap。
- 优化 Cache Pressure:控制系统如何优先清理内存缓存。
- 调整 Swap 大小(可选):根据系统需求调整 Swap 分区或 Swap 文件的大小。
- 使用 Zswap 或 ZRAM(高级优化):压缩内存中的 Swap 数据,提高性能。
以下是具体步骤:
(一)调整 Swapiness
Swappiness 值控制了内核如何频繁地将数据移到 Swap 中。默认值通常为 60,可以根据实际情况调整:
- 值较大(如 60-100):系统会更频繁地使用 Swap。
- 值较小(如 10-30):系统更倾向于保留数据在内存中。
建议将 Swappiness 设置为 10,以减少 Swap 使用频率,提高性能:
echo "vm.swappiness=10" | sudo tee -a /etc/sysctl.conf
使更改生效:
sudo sysctl -p
(二)优化 Cache Pressure
vm.vfs_cache_pressure 值决定了系统清理 inode 和 dentry 缓存的优先级。默认值通常为 100,适当调低可以保留更多缓存,减少频繁的磁盘访问。建议将其设置为 50:
echo "vm.vfs_cache_pressure=50" | sudo tee -a /etc/sysctl.conf
同样使更改生效:
sudo sysctl -p
(三)调整 Swap 大小(可选)
如果系统 Swap 空间不足或过多,可以调整 Swap 大小。一般来说,Swap 大小应为物理内存的 1-2 倍。
1. 查看当前 Swap 使用情况
swapon --show free -h
2. 修改 Swap 大小
- 增加 Swap 文件(例如增加 2GB Swap 文件):
“sudo fallocate -l 2G /swapfile sudo chmod 600 /swapfile sudo mkswap /swapfile sudo swapon /swapfile - 永久添加 Swap 文件(修改
/etc/fstab):echo '/swapfile none swap sw 0 0' | sudo tee -a /etc/fstab -
减少 Swap(如果已经有足够内存且不需要过多 Swap):
- 先关闭不必要的 Swap 分区或文件,然后从
/etc/fstab中删除对应的 Swap 条目。
- 先关闭不必要的 Swap 分区或文件,然后从
3. 使用 Zswap 或 ZRAM(高级优化)
- Zswap:Zswap 是一种内存压缩池,适合有足够内存且希望减少 I/O 操作的场景。
- 启用 Zswap:
echo "zswap.enabled=1" | sudo tee -a /etc/default/grub -
更新 GRUB:
sudo update-grub
- 启用 Zswap:
-
ZRAM:将 Swap 数据压缩到内存,适合低内存设备。可以使用
zram-tools安装和管理:sudo apt install zram-tools
安装完成后,系统会自动启用 ZRAM Swap。
(四)报错
在更新 GRUB 时遇到 /etc/default/grub 中的 zswap.enabled=1 配置错误,通常是因为格式不正确。/etc/default/grub 文件中应该在 GRUB_CMDLINE_LINUX_DEFAULT 行中添加 z,而不是单独一行。请按照以下步骤进行修复:
1. 编辑 /etc/default/grub
打开 /etc/default/grub 文件进行编辑:
sudo nano /etc/default/grub
2. 修改 GRUB_CMDLINE_LINUX_DEFAULT
找到 GRUB_CMDLINE_LINUX_DEFAULT 行,应该像这样:
GRUB_CMDLINE_LINUX_DEFAULT="quiet splash"
将其修改为:
GRUB_CMDLINE_LINUX_DEFAULT="quiet splash zswap.enabled=1"
如果文件中已经有其他参数,只需在引号内添加 zswap.enabled=1,确保用空格分隔。
3. 保存并退出
在 nano 中,可以按 Ctrl + O 保存更改,然后按 Enter 确认,再按 Ctrl + X 退出。
4. 更新 GRUB 配置
再次运行 GRUB 更新命令:
sudo update-grub
5. 重启系统
重启系统以使更改生效:
sudo reboot
6. 验证 Zswap 是否启用
重启后,您可以通过以下命令检查 Zswap 是否已启用:
cat /sys/module/zswap/parameters/enabled
如果返回值为 Y,则表示 Zswap 已成功启用。
十、Shell配置
(一)命令自动补全忽略大小写
该配置针对 Bash,仅使用 Zsh 可以忽略。
echo 'set completion-ignore-case on' >> ~/.inputrc
(二)别名定义
一般 Linux 中默认定义了 ll 别名,但参数比较少,需要使用更加强大的 lll 别名。
Debian 默认并没有定义 ll 别名。
写入环境变量(当前用户优先执行)
bash:
echo 'alias ll="ls -lahF --color=auto --time-style=long-iso"' >> ~/.bashrc
zsh:
echo 'alias ll="ls -lahF --color=auto --time-style=long-iso"' >> ~/.zshrc
注意:仅仅针对当前用户,写入全局用户配置文件:/etc/skel/.bashrc 或者 /etc/skel/.zshrc
十一、tmp重定向
在安装大程序,如Stable Diffusion等时,可能会出现 error 28,磁盘空间不足,但是检查完后,空间足够。
可能的原因,/var 和 /home 空间不够。可以重定向到空间足够的分区。
通过设置 TMPDIR 环境变量,将临时文件写入 root 分区中的一个目录,如 /root/tmp:
export TMPDIR=/root/tmp
确保目录存在,且有足够权限:
mkdir -p /root/tmp


必须 注册 为本站用户, 登录 后才可以发表评论!